Pages

August 9, 2011

Butterfly Resist

I took some of my new goodies to stamp with a friend. I hadn't stamped in a long time but this is what I came up with. I kept this card simple as I was making it for my mom. She doesn't like a whole lot of layers or"stuff" on her cards. THis card features the new oval Designer Label embossing folder.

Rubber Inkspiration Tips:
  • Stamp & color background piece in Lucky Limeade & Calypso Coral before embossing with the square lattice folder.
  • Emboss resist technique: Blot off color before going onto project to avoid stark/harsh sponging lines. Alternatively, start off the paper & sponge into the center. 
  • Dress up the inside of the card too. I used a simple mak to over stamp the butterfly.
 
SUPPLIES
Stamps: Creative Elements, Summer Solstice
Ink: Lucky Limeade, Calyspo Coral
Technique: Emboss resist
Accessories: Designer Label (Oval), Square Lattice, Clear embossing powder, wide Oval Punch


August 8, 2011

MOJO203

Two Posts today/. I decided to try this week's sketch at MOJO Monday. This is what I came up with.

SUPPLIES:
Ink: Early Espresso, Pumpkin Pie, Versamark
Paper: Pear Pizazz, Crumb Cake, Early Espresso, Paisley Petals
Stamps: Kindness Matters, Curly Cute, Creative Elements

Simple Sympathy

My Mom had asked for some sympathy cards to have on hand. She wanted something very simple. To her a sympathy card is white with Gold lettering. I have very limited sympathy sentiments so I used this retired set. I thought the Card was simple but elegant.My Mom was pleased with this one. What do you think?

Rubber Inkspirations Tips:
  • Punch the window with your wide oval punch first, then align the oval embossing folder over the widow cut out. You will get the perfect alignment this way.
  • Use light pencil marks to mark the edges of the windo opening to help with placement of the sentiment. Best to make the marks small, if you have to erase after the sentiment is embossed, the eraser dulls the shine of the embossing powder.
  • Use the embossing buddy. I find there is less "haze" on my cardstock if I use the embossing buddy first. By has I mean like a light powder not actual embossing granules. It is really noticeable on light & dark cardstock.
  • I used a heavy weight white cardstock for the base of the card because it is only a one layer card.

SUPPLIES
Stamps:  Simply Soft (hostess), Thanks for Caring
Ink: Versamark, Pretty in Pink & Pear Pizazz Markers
Accessories: Wide oval punch, Gold embossing Powder, Oval Designer Frame, Blender Pen

August 7, 2011

Concord case

Well, it has certainly been a long time since my last post. I am on holidays & got a chance to do some stamping.
A friend went to convention this year & I had an opportunity to see the swaps she got. One swap took my eye so I had to case it. Sorry I don't know who the original artist is. My mom is visiting and asked for some sympathy cards, so I got to work. The products are all SU. The sentiment is from the retired set Warmest Regards.

Rubber Inkspirations Tips:
  • Ink background stamp, leave face-up, place cardstock on stamp, cover with scrap piece of paper & rub back of card stock  being careful not to shift the card stock, Get an even impression each time.
  • Stamp in versamark ink, then in classic ink, then stamp on the project & use clear embossing powder to emboss. This will give your project a little shine & you just expanded your use of classic ink pads by adding the versa mark.
  • The Concord Crush panel is 4 3/8 x 31/8. The stamped panel is 4 1/8 x 2 7/8.

Stamps: Warmest Regards, En Francais, Creative Elements
Ink: Wisteria Wonder, Concord Crush, Versamark
Accessories: Framed Tulips, Square lattice, Modern Label punch

April 24, 2011

Organization Ideas

Always love organizing ideas. Here are some of mine for you.
For Clear stamps, Sizzix dies and background stamps I use a vertical spinning DVD storage tower from Sears.


 On one shelf you can fit:
22 unmounted stamp cases or
19 bigz dies, or
13 wood mounted background stamps (taken out of the case & stood on narrow end like a book)
The shelves are adjustable so you can adapt it to your needs, I also store 6x6 DSP on these shelves. This is a great solution for a small space & cost $130.


For wood mounted stamp sets, I have bookshelves from Ikea with some extra shelves in them. I store the stamps in their case on the side. Shelves are adjusted so they just fit the width of each case. This way, you pull out one set & the rest stay in place. I have about 22 sets on each shelf.  I organize mine by case size then they are indexed. I use my "inventory catalog" that I created for each stamp set I own so I can go right to it. Makes it easy to keep sets organized.
 
For the new punches, I currently have them stored stacked up on one another in one section of my homemade foamcore ink pad storage system. It works really well and costs about $3 to make one if you get your foam core at the $ store. I have run out of space so I am looking for other options too.

April 17, 2011

Roses for you - PPA89

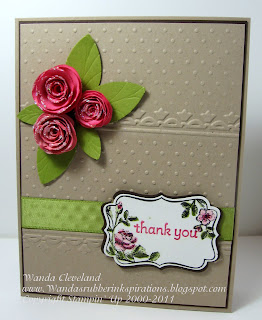
It has been awhile since my last post. I am trying to find my Mojo. Not too sure about  this card. I had some issues with the leaves. After I added the small leaves I thought, this looks like a pansy. I thought about adding some more leaves then thought I better quit while I was ahead. The roses are made using the scallop circle punches & then cutting in a spiral to Quill them up into roses. I have seen these on several blogs and not sure who the originator is.

Rubber Inkspiration Tips:
  • Adjust the size of the rose by using different size scallop circles to start with.
  • Rose size can be adjusted by how tight or loose the quill is made.
  • Break down fibres in paper with bone folder prior to cutting into spiral to make paper more pliable & easier to quill.
  • Sponge the edge of the spiral (front & back) before assembly to add dimension.
  • I used tombo mutli glue - this is the best for this type of project, it bonds quickly & holds really well.
Supplies
Stamps: Four Frames
Ink: Black Staz On, Regal Rose, Rose Red, Pretty in Pink , Pear Pizazz, Old Olive
Paper: Regal Rose, Blushing Bride, Old Olive, Crumb Cake, Early Espresso, White Glossy
Accessories: Tulip Frame & Polka dot embossing folders, decorative label punch, old olive satin ribbon, dazzling diamonds

April 1, 2011

New Clearance Rack Items & Grab Bags

Stampin' Up has added some great new items to the Clearance rack Including:
  • Retired marker sets
  • Ribbon
  • Ink pads
  • Grab Bags


Beginning today, April 1, and continuing while supplies last, you and your customers will be able to purchase special "grab bags" in the Online Store. These grab bags will come in three sizes: the $6, the $12, and the $18 grab bag. Each bag will contain a variety of discontinued products that could include a combination of any of the following: ribbons, Accents & Elements, chipboard, Designer Series Papers, and Simply Sent kit components. Grab bags will not contain stamp sets or tools.

  • There is no minimum purchase required to participate in the grab bag special offer.
  • There is no limit to the number of grab bags a customer may purchase; however, grab bag items are only available while supplies last. 
  • All grab bag sales are final. There are no refunds or exchanges.
  • Not all grab bags will be unique.
  • You should use the following item numbers when ordering grab bags:

Item
Description
125873
$6 Grab Bag (containing at least $24 worth of products!)
125874
$12 Grab Bag (containing at least $48 worth of products!)
125875
$18 Grab Bag (containing at least $72 worth of products!)

No Foolin' Spring is Blooming


Who doesn't like a sneak peek of what's to come?  Well, Stampin' Up! has a new promotion that gives us a little taste of what is to come in the new 2011-2012 Idea Book & Catalog, which premieres on July 1. 
Check out these two new, Sneak Peek items:

Four Frames Stamp Set (which fits neatly in the Decorative Label Punch)
Wood-Mount: Item #123440 | $25.95
Clear-Mount: Item #123442 | $19.95

Paisley Petals Designer Series Paper
Item #122367 | $12.50

From April 1 - April 30, you can get these brand-new items in two ways:
  1. Purchase
Spend $25 on any Stampin' Up! products and become eligible to purchase both the Four Frames Set and Paisley Petals Designer Series Paper. Order Online Now!
  1. Host A workshop
Host a $460 workshop and get the Four Frames Set and Paisley Petals Designer Series Paper for FREE!

See complete promotional details on the Spring is Blossoming page.
Wait a minute!  Did you read that right?  You can get BOTH items for FREE?! 
Yes, you can!

Your Bonus to host a girls night out stamping workshop of $460 or more during April:

  • Free Four Frames Stamp set Value $25.95
  • Free Paisley Prints DSP Value $12.50
  • Level 1 or Level 2 Hostess set Value 25.95 
  • $50 your choice of  Stampin’ Up merchandise 
  • Bonus from me Scallop Trim Border Punch value 22.95


Wow!  That's $137 of FREE goodies!  Imagine all of the fabulous Spring projects you could make with all those stamping supplies!  Fun, fun, fun!

Contact me today to schedule your April workshop!